As Microsoft announced in mid-June, they will update the default app consent configuration in Entra ID, unless an administrator has already customized the default configuration.
From MC1097272 – Require admin consent for third-party apps accessing files and sites
Users allowing third-party apps to access file and site content can lead to overexposure of an organization’s content. Requiring admins to consent to this access can help reduce overexposure. With this change, Microsoft managed App Consent Policies will be enabled, and users will be unable to consent to third party applications accessing their files and sites by default. Instead, they can request administrators to consent on their behalf. To configure admin consent, follow instructions here: Configuring the Admin Consent workflow. Customers who have already blocked user consent, turned on our previously recommended consent settings, or applied custom user consent settings will not be affected by this change.
Admins can also configure granular app access policies, such as limiting user access to the application for specific users or groups.
To understand the impact, I recommend watching or listening to the podcast with Erin and Merill about this change.
My key takeaways from their chat:
- No impact if you have already customized the default app consent configuration.
- Microsoft will replace “microsoft-user-default-legacy” with a new Microsoft-managed app consent policy.
- The new policy will require admin consent for four Microsoft Graph permissions:
Files.Read.All, Files.ReadWrite.All, Sites.Read.All, Sites.ReadWrite.All - No impact on existing apps or users.
- No impact on apps with permissions other than the four.
- Microsoft may secure the new policy later with additional permissions or settings.
In my case, I was particularly interested in learning how to build a custom policy, as Erin mentioned several times. Specifically, I wanted to simulate the upcoming Microsoft-managed policy as a custom app consent policy.
Microsoft references this documentation to create a custom app consent policy.
In this post, I’ll give you some insights and guide you through each necessary step. By the end, you’ll have the flexibility to precisely allow or block specific permissions within your custom app consent policy. You’ll also see that this custom policy is a powerful feature once you understand how to configure it.
Content
Getting app consent policy information
I’m using the Microsoft Graph Authentication module with the Policy.ReadWrite.PermissionGrant permission to retrieve all existing app consent policies.
Import-Module Microsoft.Graph.Authentication
Connect-MgGraph -Scopes "Policy.ReadWrite.PermissionGrant"

$Url = 'https://graph.microsoft.com/v1.0/policies/permissionGrantPolicies'
$PermGrantPoliciesResult = Invoke-MgGraphRequest -Method Get -Uri $Url
$PermGrantPoliciesResult.value | select id, displayName, description
The request returns 13 app consent policies.
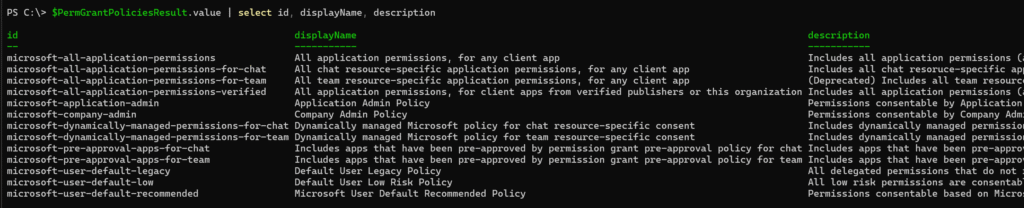
Three of them are relevant for the app consent screenshot above.
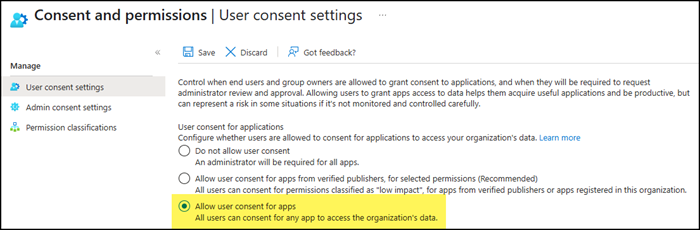
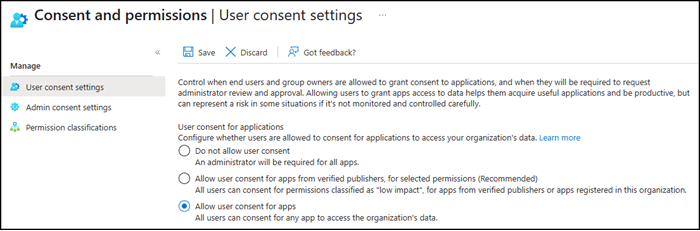
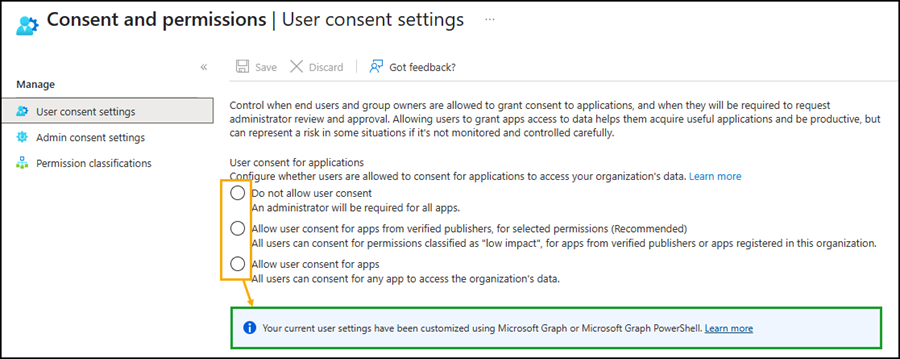
- microsoft-user-default-legacy is connected to the configuration “Allow user consent for apps.”
This policy will be replaced by a new one between mid-July and mid-August.
- microsoft-user-default-low is connected to the configuration “Allow user consent for apps from verified publishers, for selected permissions (Recommended)” if you select no preconfigured permissions.
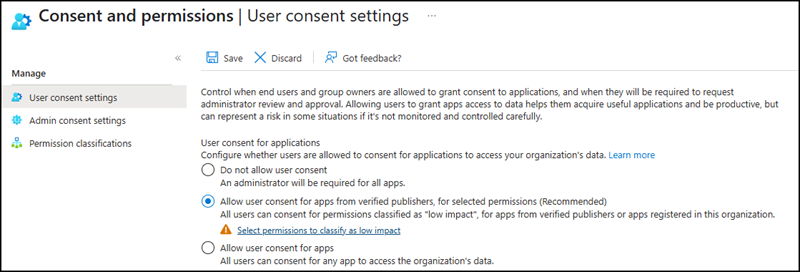
- microsoft-user-default-recommended is connected to “Allow user consent for apps from verified publishers, for selected permissions (Recommended)” if you choose the proposed permissions or some of them.
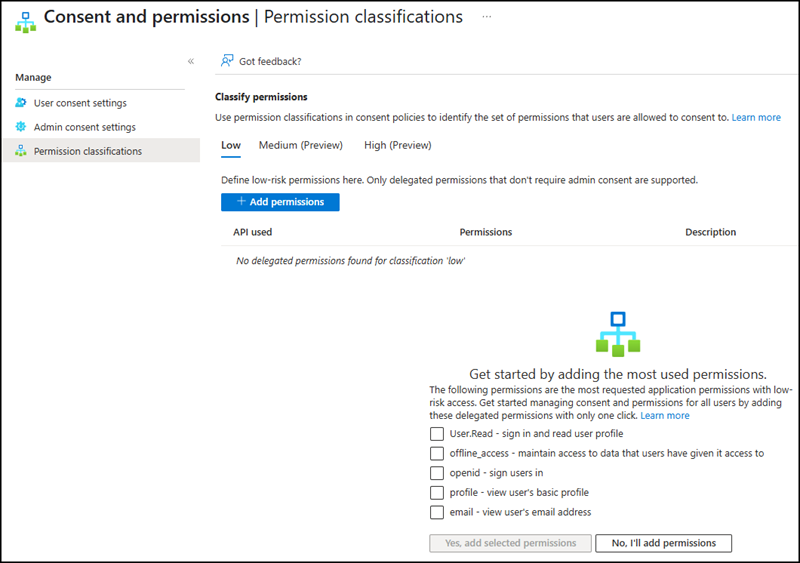
- “Do not allow user consent” disables the app consent for users. No app consent policy is assigned to default users.

At least in my tenant, there is no new Microsoft-managed policy yet.
Configuring a custom app consent policy
I create my own app consent policy. This creation step does not affect your current users, it simply prepares the custom policy for future use.
First, create a new, empty app consent policy.
$Body = @"
    {
    "id": "topedia-managed-default-policy",
    "displayName": "Topedia Managed Default Policy",
    "description": "This policy should simulate the upcoming Microsoft-managed app consent policy"
    }
"@

$Url = "https://graph.microsoft.com/v1.0/policies/permissionGrantPolicies"
$NewCustomAppConsentPolicy = Invoke-MgGraphRequest -Method Post -Uri $Url -Body $Body -ContentType "application/json"

# Getting the new policy
$Url = "https://graph.microsoft.com/v1.0/policies/permissionGrantPolicies/$($NewCustomAppConsentPolicy.id)"
$PermPolicyTopediaCustom = Invoke-MgGraphRequest -Method Get -Uri $Url
$PermPolicyTopediaCustom
There is the new policy with an empty excludes and includes value.

Next, you need to configure the includes and excludes:
- Includes define which app consents are allowed for users assigned to this policy. A policy should have at least one includes configuration. You cannot delete the last includes configuration (but you can delete the entire policy).
- Excludes specify which app consents are explicitly denied, even if they would otherwise be allowed. For example, you might exclude high-privilege permissions such as Files.Read.All, Files.ReadWrite.All, Sites.Read.All, and Sites.ReadWrite.All.
Define the Includes
If you’re new to app consent policies, I recommend reviewing one of the pre-configured Microsoft policies as a reference. In my example, I’m using the microsoft-user-default-recommended policy to examine its included permissions.
# Getting the policy and checking the values of includes
$Url = 'https://graph.microsoft.com/v1.0/policies/permissionGrantPolicies/microsoft-user-default-recommended'
$PermPolicyUDR = Invoke-MgGraphRequest -Method Get -Uri $Url
$PermPolicyUDR.includes
The result shows the delegated permissions that users are allowed to consent to on their own for the Microsoft Graph resource application. Consent is restricted to client applications from verified publishers only.

I am building my own includes with a different set of configurations.
- All delegated permissions are allowed.
- Only client applications from verified publishers are allowed. Refer to the documentation about verified publishers for more information.
- All resource applications are allowed.
$PermGrantPolicyIncludesBody = @"
{
"permissionType": "delegated",
"permissions": [ "all"],
"clientApplicationIds": [ "all" ],
"clientApplicationsFromVerifiedPublisherOnly": true,
"clientApplicationTenantIds": [ "all" ],
"clientApplicationPublisherIds": [
"all"
],
"resourceApplication": "any"
}
"@
$Url = "https://graph.microsoft.com/v1.0/policies/permissionGrantPolicies/$($NewCustomAppConsentPolicy.id)/includes"
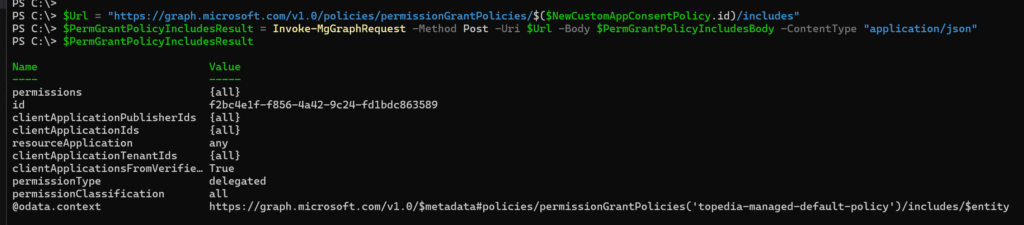
$PermGrantPolicyIncludesResult = Invoke-MgGraphRequest -Method Post -Uri $Url -Body $PermGrantPolicyIncludesBody -ContentType "application/json"
$PermGrantPolicyIncludesResult
The Includes configuration is done.
Define the Excludes
I define the excludes to restrict four specific permissions from being granted via delegated consent. These same permissions are also excluded by Microsoft.
- Microsoft Graph – Files.Read.All
- Microsoft Graph – Files.ReadWrite.All
- Microsoft Graph – Sites.Read.All
- Microsoft Graph – Sites.ReadWrite.All
To exclude specific permissions, you’ll need their permission IDs. You can find these IDs in the permission list of a registered app.
I recommend using PowerShell to retrieve the permission resource and collect the required permissions from it, then retrieve all IDs.
Get the resource app, in the current case Microsoft Graph.
$Url = "https://graph.microsoft.com/v1.0/servicePrincipals(appId='00000003-0000-0000-c000-000000000000')"
$MSGraphResource = Invoke-MgGraphRequest -Method GET -Uri $Url
You find 621 possible permissions.

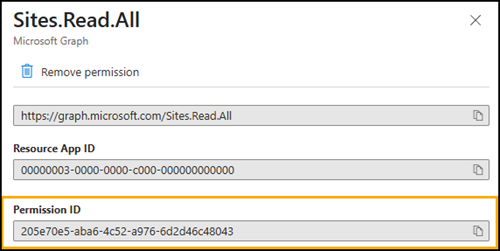
You can search for the specific permission within the Microsoft Graph resource application to locate its corresponding permission ID.
$MSGraphResource.oauth2PermissionScopes | ?{$_.value -eq "Sites.Read.All" }
There is the required permission ID.

With that, it’s easy to gather the four required permission IDs for my exclusion list.
$ExcludedPermissions = @()
$ExcludedPermissions += ($MSGraphResource.oauth2PermissionScopes | ?{$_.value -eq "Files.Read.All" }).id
$ExcludedPermissions += ($MSGraphResource.oauth2PermissionScopes | ?{$_.value -eq "Files.ReadWrite.All" }).id
$ExcludedPermissions += ($MSGraphResource.oauth2PermissionScopes | ?{$_.value -eq "Sites.Read.All" }).id
$ExcludedPermissions += ($MSGraphResource.oauth2PermissionScopes | ?{$_.value -eq "Sites.ReadWrite.All" }).id
Permissions completed.

Now, building the exclusion.
Exclude the four permissions from the Microsoft Graph resource.
$PermGrantPolicyExcludesBody = @{
    permissionType      = "delegated"
    permissions         = $ExcludedPermissions
    resourceApplication = $MSGraphResource.appId
    id                  = $MSGraphResource.Id
} | ConvertTo-Json -Depth 3


$Url = "https://graph.microsoft.com/v1.0/policies/permissionGrantPolicies/$($NewCustomAppConsentPolicy.id)/excludes"
$PermGrantPolicyExcludesResult = Invoke-MgGraphRequest -Method Post -Uri $Url -Body $PermGrantPolicyExcludesBody -ContentType "application/json"
$PermGrantPolicyExcludesResult
The Excludes configuration is done.

Assigning a custom app consent policy
Your custom app consent permission policy is now ready.
Next, you need to apply the policy to your users by replacing the existing policy with your custom one. Microsoft provides guidance on this process here.
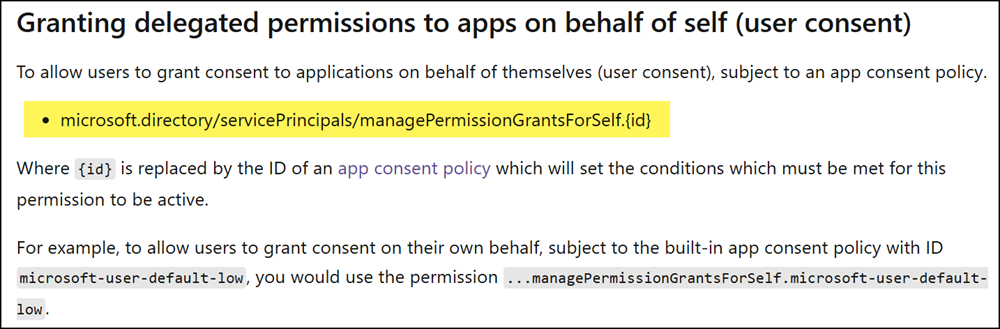
You need to locate the configuration named managePermissionGrantsForSelf.{id}.
The default app consent policy is embedded within the authorization policy of your tenant. I review my authorization policy and expand the defaultUserRolePermissions value to examine it in detail.
$Url = "https://graph.microsoft.com/v1.0/policies/authorizationPolicy"
$AuthorizationPolicy = Invoke-MgGraphRequest -Method GET -Uri $Url
$AuthorizationPolicy | select -expand defaultUserRolePermissions | ft -AutoSize
You’ll find the information you need under the permissionGrantPoliciesAssigned value.

This configuration defines the default app consent policy for your users. Expand the value.
$AuthorizationPolicy.defaultUserRolePermissions.permissionGrantPoliciesAssigned
You will find three assigned policies, one of which is the microsoft-user-default-legacy policy that Microsoft plans to replace.
When you update the app consent configuration in Entra ID, the system automatically updates this authorization policy accordingly.

Now, you need to replace the legacy policy with your custom policy, but ensure that you do not overwrite the other policies.
# Replace the default app consent policy with the new custom policy and leave the other policies intact
$AuthorizationPolicyUpdate = $AuthorizationPolicy.defaultUserRolePermissions.permissionGrantPoliciesAssigned | ?{ $_ -notlike "ManagePermissionGrantsForSelf.*" }
$AuthorizationPolicyUpdate += "ManagePermissionGrantsForSelf.$($NewCustomAppConsentPolicy.id)"

$AuthorizationPolicyBody = @{
    defaultUserRolePermissions = @{
        permissionGrantPoliciesAssigned = $AuthorizationPolicyUpdate
    }
} | ConvertTo-Json

$Url = "https://graph.microsoft.com/v1.0/policies/authorizationPolicy"
Invoke-MgGraphRequest -Method PATCH -Uri $Url -Body $AuthorizationPolicyBody -ContentType "application/json"
After completing your update, check the app consent configuration in Entra ID.
Although all options will appear empty, you should see a note indicating that a custom app consent policy has been configured.
Validating your custom app consent policy
I enabled the app admin consent approval workflow configuration for my testing purposes.
The assigned custom app consent policy is active after a few minutes. Let’s test some of the third-party app consent with the updated permission requirements.
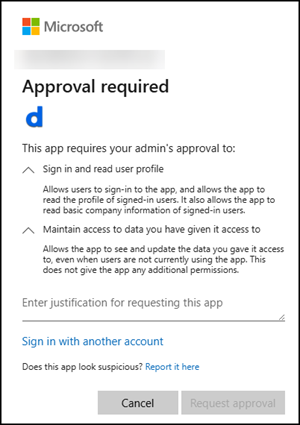
Doodle
Doodle has the following consent information for the app:
- Doodle AG is not a verified publisher
- Permission: Microsoft Graph – User.Read
- Permission: Microsoft Graph – offline.access
User consent requires admin approval. The reason is the unverified publisher.
Notion
Notion has the following consent information for the app:
- Notion Labs is a verified publisher
- Permission: Microsoft Graph – openid
- Permission: Microsoft Graph – profile
- Permission: Microsoft Graph – email
- Permission: Microsoft Graph – User.Read
- Permission: Microsoft Graph – offline.access
User consent is allowed.
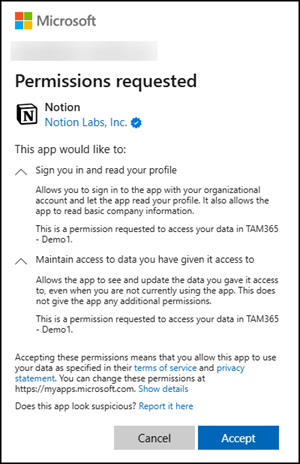
Please note, Notion offers the option to connect your OneDrive with your Notion account. However, this app consent requires admin approval because it requests one of the permissions excluded by your custom policy.
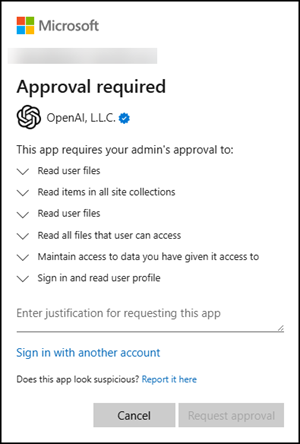
ChatGPT
A good, bad example for such a test.
ChatGPT has the following consent information for the app.
- OpenAI is a verified publisher
- Permission: Microsoft Graph – Files.Read
- Permission: Microsoft Graph – Files.Read.All
- Permission: Microsoft Graph – offline_access
- Permission: Microsoft Graph – User.Read
- Permission: Office 365 SharePoint Online – MyFiles.Read
- Permission: Office 365 SharePoint Online – AllSites.Read
User consent requires admin approval. The reason is the excluded permission Files.Read.All.
The new custom policy is working as expected.
Excluding SharePoint Online permissions in your custom policy
Now that you understand how to configure such a policy, it’s relatively straightforward to extend or customize it. For example, I want to exclude additional permissions, particularly those related to the Office 365 SharePoint Online resource.
- SharePoint – MyFiles.Read
- SharePoint – MyFiles.Write
- SharePoint – AllSites.Read
- SharePoint – AllSites.Write
- SharePoint – AllSites.Manage
- SharePoint – AllSites.FullControl
You simply add a second Excludes configuration to your custom policy and specify the six permissions along with the SharePoint Online resource. The application ID of Office 365 SharePoint Online is 00000003-0000-0ff1-ce00-000000000000.
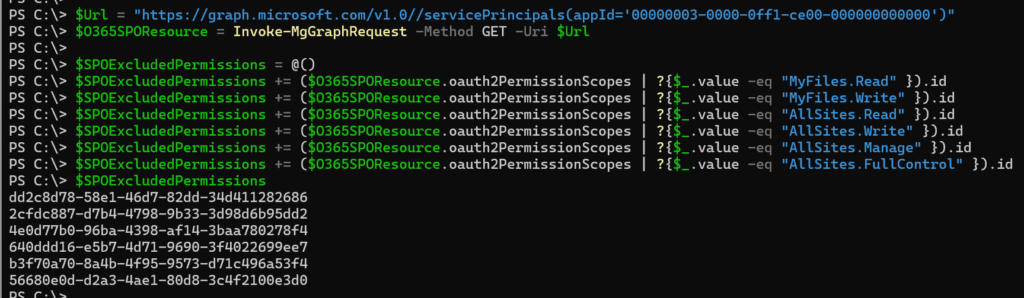
# Office 365 SharePoint Online
$Url = "https://graph.microsoft.com/v1.0/servicePrincipals(appId='00000003-0000-0ff1-ce00-000000000000')"
$O365SPOResource = Invoke-MgGraphRequest -Method GET -Uri $Url

$SPOExcludedPermissions = @()
$SPOExcludedPermissions += ($O365SPOResource.oauth2PermissionScopes | ?{$_.value -eq "MyFiles.Read" }).id
$SPOExcludedPermissions += ($O365SPOResource.oauth2PermissionScopes | ?{$_.value -eq "MyFiles.Write" }).id
$SPOExcludedPermissions += ($O365SPOResource.oauth2PermissionScopes | ?{$_.value -eq "AllSites.Read" }).id
$SPOExcludedPermissions += ($O365SPOResource.oauth2PermissionScopes | ?{$_.value -eq "AllSites.Write" }).id
$SPOExcludedPermissions += ($O365SPOResource.oauth2PermissionScopes | ?{$_.value -eq "AllSites.Manage" }).id
$SPOExcludedPermissions += ($O365SPOResource.oauth2PermissionScopes | ?{$_.value -eq "AllSites.FullControl" }).id
Six permission IDs collected.
Now, I’m adding a second Excludes configuration to the custom policy.
# Create a second excludes body for a custom app consent policy
$PermGrantPolicyExcludesBody = @{
permissionType = "delegated"
permissions = $SPOExcludedPermissions
resourceApplication = $O365SPOResource.appId
id = $O365SPOResource.Id
} | ConvertTo-Json -Depth 3
$Url = "https://graph.microsoft.com/v1.0/policies/permissionGrantPolicies/$($NewCustomAppConsentPolicy.id)/excludes"
$PermGrantPolicyExcludesResult = Invoke-MgGraphRequest -Method Post -Uri $Url -Body $PermGrantPolicyExcludesBody -ContentType "application/json"
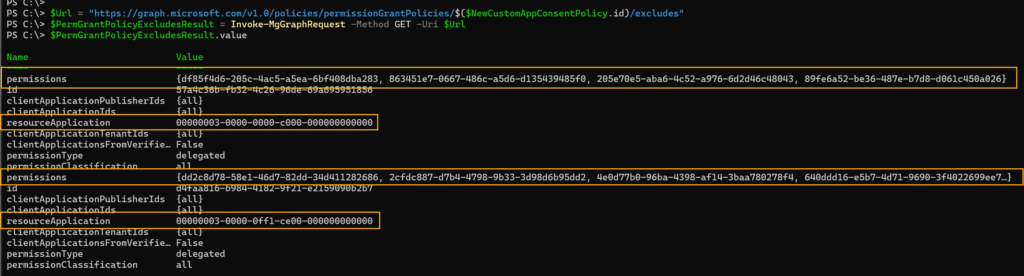
# Checking the excludes of the custom app consent policy
$Url = "https://graph.microsoft.com/v1.0/policies/permissionGrantPolicies/$($NewCustomAppConsentPolicy.id)/excludes"
$PermGrantPolicyExcludesResult = Invoke-MgGraphRequest -Method GET -Uri $Url
$PermGrantPolicyExcludesResult.value
The result returns two resources, each with a distinct set of permissions.
That’s it, you now have great flexibility to allow or block specific permissions, resources, and other configurations within your custom app consent policy.